Two ways to develop
Agent-Lab is a framework you consume as a library, and it is also a repository you can work in directly. Both are supported:
- As a library (recommended for products). Add
btech-agent-labto your own project, define agents by extending the base classes, and assemble the app withcreate_app(). You extend the framework through its public API — subclassing, decorators and configuration — and never edit framework code. Start with the Tutorial or the Quickstart, then read Extending the framework. To skip the boilerplate, scaffold a ready-made consumer project withuvx cookiecutter gh:btech-software/agent-lab --directory cookiecutter(see cookiecutter/README.md). - In-repo (for contributors and the reference implementation). Clone the
repository and add agents under
agent_lab/services/agent_types/, run the bundled reference app, and use the notebooks and integration tests. This is how the built-in agents are developed. See Building agentic workflows.
Both paths use the same building blocks; the difference is only where your code lives. Pick whichever fits your project.
Setup
Install
Agent-Lab targets Python 3.12+ and uses uv for dependency management.
Consuming Agent-Lab as a library — install it into your own project:
pip install btech-agent-lab
# or
uv add btech-agent-lab
Working in the repository — clone it and sync the environment:
git clone https://github.com/btech-software/agent-lab.git
cd agent-lab
uv sync                 # runtime dependencies
uv sync --group test    # add the test/simulation dependencies
Make sure Docker or another container runtime is installed and running — the integration tests use it (via testcontainers) and the bundled Docker Compose files provide the application's dependencies.
Copy the example environment file
cp .env.example .envThis file contains API keys for AI suppliers and the endpoints used by the agent simulations. Every variable is documented in the Configuration reference.
Reference Implementation
The repository ships a complete reference application (agent_lab.main) that registers
every built-in agent — RAG, browser automation, voice memos, vision, and multi-agent
supervisors. It is both a deployable product and the canonical example of how to
consume the framework: it is nothing more than a create_app() call over the built-in
agent packages.
# agent_lab/main.py
from agent_lab.app_factory import create_app

app = create_app()  # scans DEFAULT_SCAN_PACKAGES: all built-in capabilities
Use it as a live reference while building your own app, and as the fastest way to try Agent-Lab end-to-end. Provisioning its infrastructure (the three PostgreSQL databases, Redis, Keycloak, Vault) in development or production is covered in the Deployment guide. The next section shows how to run it locally.
Running the Application
Start the application with Uvicorn
For development and debugging with an IDE, run the reference app directly:
uvicorn agent_lab.main:app --reloadAccess the interactive OpenAPI documentation at http://localhost:8000/docs.
When you consume Agent-Lab as a library, you run your app the same way — point
uvicorn at the module that calls create_app():
uvicorn app:app --reload # where app.py defines `app = create_app(scan_packages=[...])`Start the application with Docker Compose
Two pre-configured Docker Compose files run the reference app together with an observability stack:
compose-grafana.yml: the application plus Grafana, Prometheus, Tempo and Loki.compose-opensearch.yml: the application plus OpenSearch Dashboards.
docker compose -f compose-grafana.yml up --build       # Grafana stack
docker compose -f compose-opensearch.yml up --build    # OpenSearch Dashboards stack
After the application starts, the API is available at http://localhost:18000/docs. Observability dashboards:
- Grafana: http://localhost:3000 (default credentials:
admin/admin). See the Grafana example. - OpenSearch Dashboards: http://localhost:5601. See the OpenSearch example.
Development Practices
Dependency Injection
The application uses Dependency Injector for dependency injection, which keeps concerns separated and makes testing easier.
The container is defined in agent_lab/core/container.py. When consuming Agent-Lab as
a library, subclass Container to add your own providers and pass the instance to
create_app(container=...). When working in-repo, register additional framework
services directly on the container.
Application configuration
Configuration is loaded through a ConfigSource (see agent_lab/core/config.py) and
bound to the DI container. The framework ships three YAML sources for development and
testing, selected automatically by environment variable:
config-dev.yml: development environment, activated whenDEVELOPINGis set — intended for IDE debugging.config-test.yml: testing environment, activated whenTESTINGis set — used by the integration test setup.config-docker.yml: Docker Compose environment, activated whenDOCKERis set.
These files define settings such as database connections and auth, and are meant for
development and testing only. In production, use Vault via
VaultConfigSource (the default when no environment flag is set). To supply
configuration from a different backend, implement your own ConfigSource and pass it
to create_app(config_source=...). Every configuration key and environment variable
is documented in the Configuration reference.
Entity Domain Model
See the Entity Domain Model for the data model — the entities and their relationships used across the application.
Logging and Observability
The application uses OpenTelemetry for logging and
observability; the setup lives in agent_lab/infrastructure/metrics/tracer.py. FastAPI,
HTTPX, LangChain, SQLAlchemy and OpenAI calls are instrumented out of the box, with
pluggable backends for Langfuse and LangWatch.
See the Observability guide for details.
Testing
The project uses pytest with a focus on integration testing (coverage gate: 90%), backed by Testcontainers so tests run against real services in Docker containers. A separate simulation suite evaluates agent behavior end-to-end with an LLM-as-judge.
make test               # unit + integration with coverage
make test_simulations   # end-to-end agent simulations (calls live LLMs)
The first execution can take several minutes as it downloads Docker images and embedding models. See the testing guide for the full picture.
Initialize pre-commit
If you plan to contribute to the codebase or build new agents on top of Agent-Lab, install the pre-commit hooks:
pre-commit installThis ensures your code follows the project's coding standards before committing.
Building agentic workflows
Agent-Lab is built on top of LangGraph, which provides a powerful way to build agentic workflows using LLMs. Building one is a straightforward process thanks to the modular architecture and the agent base classes.
Define a new Agent implementation
Agent is a core concept in Agent-Lab, representing an autonomous entity that can perform tasks, make decisions, and interact with other agents or external systems. An agent is a concrete implementation of one of the base classes:
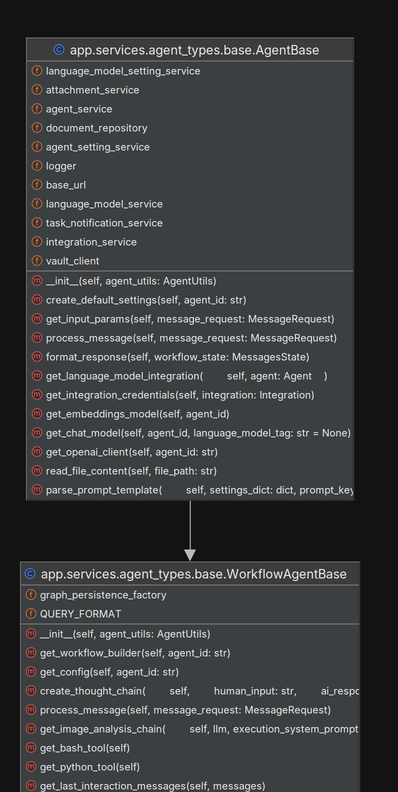
A class that extends WorkflowAgentBase defines:
- a workflow representing the agent's behavior — tasks, decision-making, and interactions with other agents or external systems.
- initialization parameters such as the prompts (Jinja2 templates) and other settings that customize the agent's behavior (vector store collections, temperature, and so on).
Here is an example of persisted initialization parameters for an agent that performs voice transcription and analysis, after the agent is created and stored in the database:
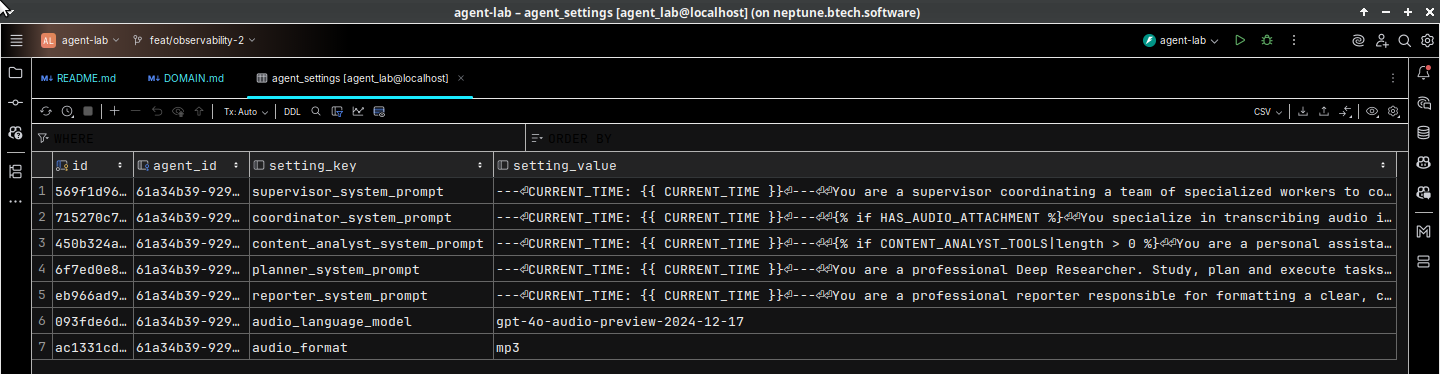
Multiple agents backed by the same implementation can be created and refined via the REST API.
Register the agent with @discoverable_agent
Decorate your AgentBase subclass with @discoverable_agent("<agent_type>"). That single
decorator is all the registration an agent needs — it makes the agent:
- discoverable by the agent registry (
agent_lab/services/agent_types/registry.py), - resolvable through the DI container, which lazily instantiates it and injects any
declared
extra_deps, - valid at the API, because the agent creation schema validates
agent_typeagainst the registry dynamically.
from agent_lab import AgentBase, AgentUtils, discoverable_agent


@discoverable_agent("my_agent", extra_deps=("my_service",))
class MyAgent(AgentBase):
    def __init__(self, agent_utils: AgentUtils, my_service):
        super().__init__(agent_utils)
        self.my_service = my_service
    ...
Note (migration): earlier versions required manually wiring each agent into
container.py, adding it toregistry.py, and extending the Pydantic schema inagents/schema.py. Those steps are obsolete —@discoverable_agenthandles all of them. Anyextra_depsyou declare are resolved by name off the (possibly subclassed) container at instantiation time.
If an agent needs collaborators beyond AgentUtils, expose them as providers on the
container (subclass Container when consuming the library) and name them in
extra_deps.
Make the agent discoverable
The framework only imports agent modules it is told about, so the decorator fires:
In-repo: place the agent under
agent_lab/services/agent_types/— the reference app scans that package as part ofDEFAULT_SCAN_PACKAGES(create_app()).As a library: pass your package to
create_app(scan_packages=[*DEFAULT_SCAN_PACKAGES, "my_agents"])— an explicit list replaces the defaults (which is also how you exclude built-in capabilities) — or publish it from an installed package through theagent_lab.agentsentry point group so consumers pick it up automatically:# pyproject.toml of the package that ships the agents [project.entry-points."agent_lab.agents"] my_agents = "my_agents"
Experimenting with the agent implementation
See the notebooks for examples of testing an agent interactively with Jupyter, using the same dependency injection mechanism. This is a convenient way to prototype and validate behavior in a controlled environment — see the Researcher's Guide.
REST API agent interface
Once an agent is registered, create and manage instances of it through the REST API — you can run several configured instances of the same implementation, each with its own prompts and settings. See the REST API reference for the endpoint catalog and request examples.
Testing the agent
- Integration tests (
tests/integration/) validate the agent against real infrastructure with pytest and testcontainers. - Simulations (
tests/simulation/) evaluate behavior end-to-end with an LLM-as-judge. See the testing guide.
MCP Server
See the MCP Server guide for exposing your agents (and extra tools) to MCP clients such as Claude Desktop for agent discovery, dialog history, and agent-to-agent communication.
Extending the framework
When consuming Agent-Lab as a library, you shape the application entirely through
create_app() and the public API exported from the top-level agent_lab package —
never by editing framework code:
| Extension point | How |
|---|---|
| Agents | Subclass a base class, decorate with @discoverable_agent, and register via scan_packages=[...] or the agent_lab.agents entry point. |
| Services & dependencies | Subclass Container, add providers, and pass it as create_app(container=...). |
| Configuration | Implement a ConfigSource (or use YamlConfigSource / VaultConfigSource) and pass create_app(config_source=...). |
| Extra HTTP routes | Build an APIRouter, wrap it in a RouterMount (with its auth policy), and pass create_app(extra_routers=[...]). |
| MCP tools & prompts | Decorate with @discoverable_mcp_tool / @discoverable_mcp_prompt / @discoverable_mcp_registrar, register via the same scan_packages / entry-point pass as agents, and add MCP instruction fragments via create_app(mcp_instructions=[...]). |
| Tracing backends | Subclass TracingBackend and register it on your Container to export spans to your own platform. |
from agent_lab import (
    DEFAULT_SCAN_PACKAGES,
    Container,
    RouterMount,
    YamlConfigSource,
    create_app,
)

class MyContainer(Container):
    my_service = ...  # providers.Factory(MyService, ...)

app = create_app(
    container=MyContainer(),
    scan_packages=[*DEFAULT_SCAN_PACKAGES, "my_agents"],
    config_source=YamlConfigSource("config.yml"),
    extra_routers=[RouterMount(my_router, "/custom", ["custom"])],
    mcp_instructions=["Extra guidance for MCP clients."],
)
Everything above is exported from agent_lab (see agent_lab/__init__.py); the full
list of configuration keys these knobs consume is in the
Configuration reference.
Contributing
Community support is greatly appreciated. If you encounter any issues or have suggestions for enhancements, please report them by creating an issue on our GitHub Issues page.
To contribute to the project, follow these steps:
- Fork the repository.
- Create a new branch for your feature or bugfix.
- Activate the pre-commit hooks by running
pre-commit install, make your changes, and commit them with clear and concise messages. - Ensure your changes pass the pre-commit hooks and the 90% coverage gate
(
make test). - Push your changes to your forked repository.
- Create a Pull Request (PR) to the
mainbranch of the original repository.
We will review your PR and provide feedback. Thank you for your contributions and support!
Production deployment
See the Deployment guide for deploying the reference application in production using the bundled Helm charts and Terraform scripts.